Fuel Your Body, Not Your Budget: The Ultimate Guide to Homemade Energy Cookies
In today's fast-paced world, finding a quick, nutritious snack that truly sustains you can feel like a quest. Often, we reach for store-bought energy bars or cookies, only to be met with high prices, questionable ingredients, and a sugar crash shortly after. But what if there was a better way? Enter homemade energy cookies – your delicious, wholesome, and incredibly versatile answer to convenient snacking. These aren't just any cookies; they're power-packed bites designed to fuel your day, save you money, and satisfy your cravings, all while giving you complete control over what goes into your body.
The journey to crafting the perfect energy cookie often begins with a need for an alternative. For many, it's the intense demands of marathon training or simply the desire for a healthier option for busy family life. The great news is that these incredible power cookies come together with surprising ease, proving that nutritious and delicious don't have to be mutually exclusive. Say goodbye to overpriced granola bars and hello to a homemade delight that your taste buds – and your wallet – will thank you for.
Why Homemade Energy Cookies Trump Store-Bought Alternatives
The allure of grabbing a pre-packaged snack from the store is undeniable, but the benefits of making your own energy cookies are far greater and more impactful. Here’s why stepping into your kitchen for 30 minutes can make all the difference:
- Unbeatable Cost Savings: This is perhaps one of the most compelling reasons. Store-bought energy bars can range from $2 to $4 each, quickly adding up when consumed regularly. By making a batch of homemade energy cookies, you significantly reduce the cost per serving. You're buying ingredients in bulk, which is almost always cheaper than buying processed, individually wrapped items. Over a month, the savings are substantial, allowing you to invest those extra dollars elsewhere.
- Total Ingredient Control: Ever scanned a label only to find a long list of unpronounceable ingredients, artificial sweeteners, or excessive amounts of added sugars? With homemade energy cookies, you dictate every component. You choose fresh, wholesome ingredients like rolled oats, natural nut butters, and real fruits. This means no hidden preservatives, artificial colors, or unnecessary fillers – just pure, natural goodness.
- Customization for Dietary Needs & Preferences: This is where homemade truly shines. Whether you have allergies, dietary restrictions, or simply strong preferences, you can tailor your energy cookies to perfection. Need them gluten-free? Use certified gluten-free oats. Dairy-free? Opt for plant-based butter and non-dairy chocolate chips. Nut-free? Swap out the nut butter for sunflower seed butter and omit the nuts, adding extra seeds instead. This level of personalization is impossible with mass-produced options.
- Superior Freshness and Taste: There’s nothing quite like a freshly baked cookie. Homemade energy cookies offer a depth of flavor and a satisfying texture that pre-packaged items simply can't replicate. The aroma alone is enough to convert anyone!
- Empowerment and Skill Building: Baking from scratch is a rewarding experience. It connects you to your food, teaches valuable kitchen skills, and provides a sense of accomplishment. Plus, it’s a wonderful activity to share with family. For more ideas on quick and wholesome snacks, check out Whip Up Wholesome Energy Cookies in 30 Minutes for Busy Days.
Crafting Your Perfect Energy Cookie: A Journey of Customization
The beauty of homemade energy cookies lies in their adaptability. While a core recipe provides a fantastic foundation, the real magic happens when you start experimenting with ingredients to suit your taste, nutritional goals, and what you have in your pantry. Don't be intimidated by a seemingly long list of ingredients; each one plays a role in flavor, texture, and energy delivery, and most are easily swapped.
The Essential Base Ingredients:
- Rolled Oats: The hero of these cookies, providing complex carbohydrates for sustained energy and a good dose of fiber. Old-fashioned rolled oats are ideal for texture and chewiness. Quick oats can work in a pinch but might result in a slightly softer cookie.
- Nut Butter: Peanut butter (smooth or crunchy) is a classic, offering healthy fats and protein. But don't stop there! Almond butter, cashew butter, or even sunflower seed butter (for a nut-free option) are excellent alternatives, each lending its unique flavor profile.
- Butter & Sugar: Slightly salted butter often enhances all the other flavors, but unsalted works perfectly if you add a pinch of salt with your dry ingredients. Brown sugar provides a deeper, more molasses-like flavor and chewier texture, though white sugar can be substituted 1:1 if preferred. Consider natural sweeteners like maple syrup or honey for a different flavor and slightly different texture.
- Eggs: Two medium-sized eggs, preferably at room temperature, help bind the ingredients and add richness. Room temperature eggs emulsify better with the butter and sugar, leading to a smoother batter and a more consistent cookie.
Unleash Your Inner Chef: Customizable Add-Ins:
This is where your energy cookies truly become your own. Think of these as building blocks for flavor and nutrition:
- Chocolate Chips: Milk chocolate is a crowd-pleaser, but dark chocolate offers antioxidants and a richer flavor, while white chocolate provides a creamy sweetness. Dairy-free chocolate chips are a simple swap for those with sensitivities.
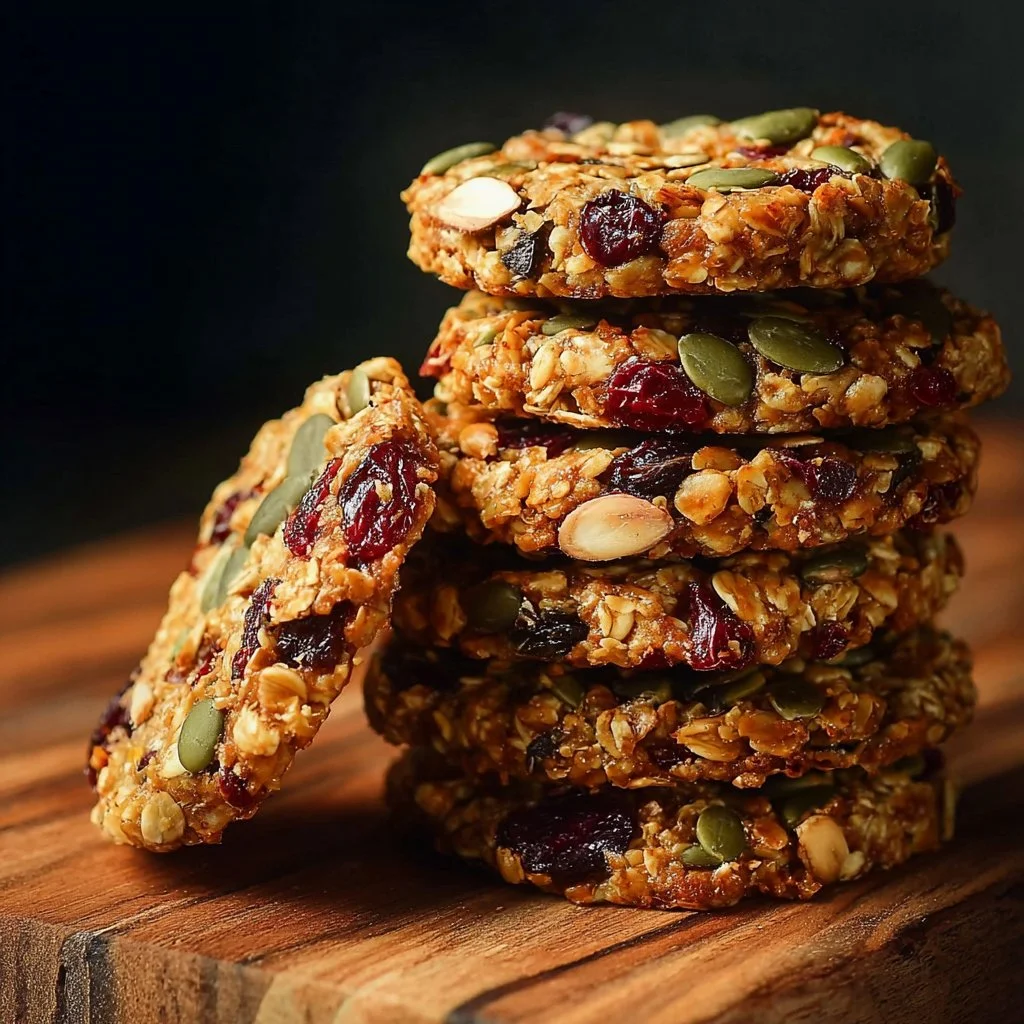
- Nuts & Seeds: Walnuts are fantastic for their healthy omega-3 fatty acids and earthy crunch. Pecans, almonds, macadamias, or hazelnuts are all delicious alternatives. For a nut-free cookie, simply omit them or swap in pumpkin seeds (pepitas), sunflower seeds, or even hemp hearts for an extra protein boost.
- Dried Fruits: Raisins are a classic, but get creative! Dried cranberries add a tart burst, chopped dates provide a caramel-like sweetness, and apricots bring a chewy, slightly tangy note. These are excellent sources of natural sugars and fiber.
- Spices & Flavorings: Elevate your cookies with a sprinkle of warmth. Cinnamon, nutmeg, ginger, or even a dash of cardamom can transform the flavor profile. A teaspoon of vanilla extract is a must for almost any cookie, enhancing all the other ingredients. Consider a secret spice blend for a truly unique touch!
- Protein Power-Ups: For those looking for an extra protein boost (especially beneficial for post-workout recovery), a scoop of unflavored or vanilla protein powder can often be incorporated into the dry ingredients. Adjust liquids slightly if the dough seems too dry.
The Simple Steps to Deliciousness & Smart Meal Prep
Creating these delightful energy cookies is surprisingly straightforward, making them perfect for even the busiest of days. The entire process, from mixing to baking, can be completed in around 30 minutes, ensuring you have a fresh, wholesome snack ready when you need it most.
- Cream & Combine: Start by creaming together your butter and sugar until light and fluffy. This aeration is crucial for cookie texture. Next, beat in your room-temperature eggs, vanilla extract, and nut butter until everything is well combined and smooth.
- Add Dry Ingredients: Gradually incorporate your dry ingredients (oats, flour, baking soda, salt, and any spices) into the wet mixture. Be careful not to overmix! Overmixing can develop the gluten in the flour too much, leading to tough cookies. Mix just until no streaks of flour remain.
- Fold in the Goodies: By hand, gently fold in your chosen mix-ins: raisins (or other dried fruits), chocolate chips, and chopped nuts (or seeds). Folding by hand prevents crushing the add-ins and further overmixing the batter.
- Shape & Bake: Scoop the cookie dough into golf-ball sized portions and arrange them on a parchment paper-lined baking tray. This ensures even baking and easy cleanup. Bake in a preheated oven at 350°F (180°C) for approximately 15 minutes, or until the edges are lightly golden and the centers are just set.
Smart Storage & Meal Prep Tips:
One of the greatest advantages of these homemade energy cookies is how well they store, making them an ideal candidate for meal prepping your snacks for the week. Once completely cooled, store your cookies in an airtight container at room temperature for up to 5 days. For longer storage, you have a couple of excellent options:
- Freezing Baked Cookies: Place baked and cooled cookies in a single layer on a baking sheet to freeze solid, then transfer them to a freezer-safe bag or container. They'll keep for up to 3 months. Thaw at room temperature or warm briefly in the microwave for a fresh-from-the-oven feel.
- Freezing Dough Balls: Prepare the dough and shape it into individual cookie balls. Place these on a parchment-lined baking sheet and freeze until solid. Once firm, transfer the frozen dough balls to a freezer-safe bag. When a craving strikes, simply place the frozen dough balls on a baking sheet and bake directly from frozen, adding a few extra minutes to the baking time. This is a game-changer for spontaneous baking! For more on preparing for busy schedules and workouts, check out Fuel Your Day: Easy Energy Cookies for Meal Prep & Workouts.
Conclusion: Your Kitchen, Your Power Snacks
Embracing the world of homemade energy cookies is more than just a recipe; it's a lifestyle upgrade. It's about taking control of your nutrition, making smart financial choices, and enjoying the immense satisfaction of creating something delicious and wholesome with your own hands. From fueling your morning commute to providing a much-needed boost during a long afternoon, these customizable cookies are a testament to the fact that healthy eating doesn't have to be complicated or expensive. So, gather your ingredients, unleash your creativity, and start baking your way to a more energized, delicious, and budget-friendly future. Your body will thank you, and your taste buds will rejoice!
